Our Standard is Perfection
A key selling point for most companies in the climbing industry is that their walls are built in accordance with the safety standards and most specifically EN 12572, part 1 and 2, and its equivalents all over the world. As a result, most customers believe that’s a sufficient guarantee for quality.
However, this can’t be further from the truth. The industry evolves so quickly and with the requirements that the climbing wall users and operators set, it’s a matter of only a couple of months for the latest EN12572 update to go out of date. Furthermore, the standard only ensures that the climbing walls are safe, however, it doesn’t set any requirements for their functionality or durability.
In this article, we’ll let you in on the important details we’ve sifted out throughout our many years of industry experience. This way, you’ll know what to look for when choosing a climbing wall which can help your business flourish and make your investment worth your while. Or quite the opposite, if not chosen wisely.
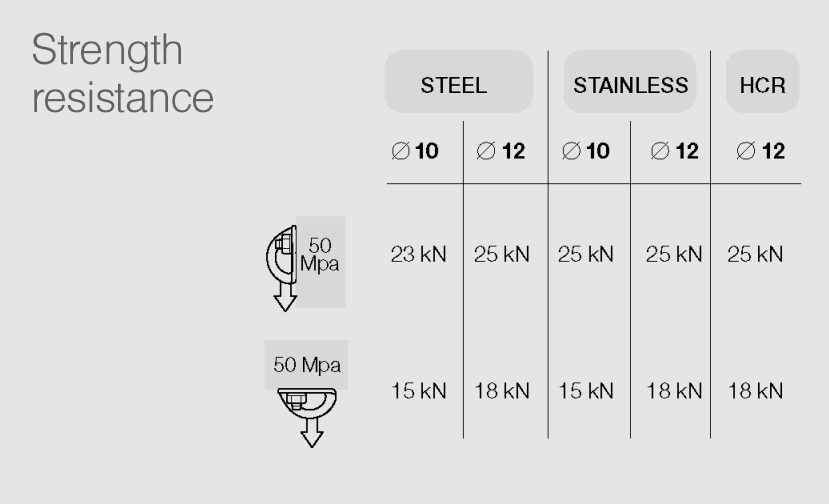
Let’s start with one of the vital equipment elements for lead climbing – the individual protection points on the climbing walls. The safety standards don’t define the type and shape of the protection points, but only the load they should be able to withstand. They also set some requirements for the shape and roundings of the opening in which the quick link of the quickdraw goes (fig 1), but how relevant are they?
The roundings described in the standard are borrowed from EN 959 and EN 795 which describe the requirements for the hangers normally used for rock climbing routes. However, when the quick links used for commercial climbing are placed in the said hanger, they have to endure a lot more load cycles and, as a result, wear out much more quickly. This way they pose a bigger risk to the climber’s safety and increase the operator’s maintenance costs.
Furthermore, it’s not advisable to use this type of hanger when installing on big overhangs or roofs. The different load direction severely reduces the strength of the hanger – most manufacturers mention this in their manuals.
The standard also requires that the nut used to fix the protection point is secured against potential loosening (lock nut). Climbing walls endure constant vibrations and sometimes even the lock-nut gets unscrewed which results in a severe threat to the climber’s well-being.
In response to all the dangers mentioned above, we invented the U-bolt which is now part of our standard equipment. It keeps the quick link from wearing out, it’s equally strong on both vertical walls and roofs as its break value is 35 kN, and it’s fixed to the metal construction with not just one but 4 nuts, 3 of which can loosen and the protection point will remain safe.
Everything we’ve mentioned about the individual protection points so far is also relevant to the top rope protection points.
As we know, the individual protection points are connected with the main support structure of the climbing wall. The standard sets clear instructions for calculating its structural integrity, but once again, leaves room for compromise when it comes to the wall’s design works.
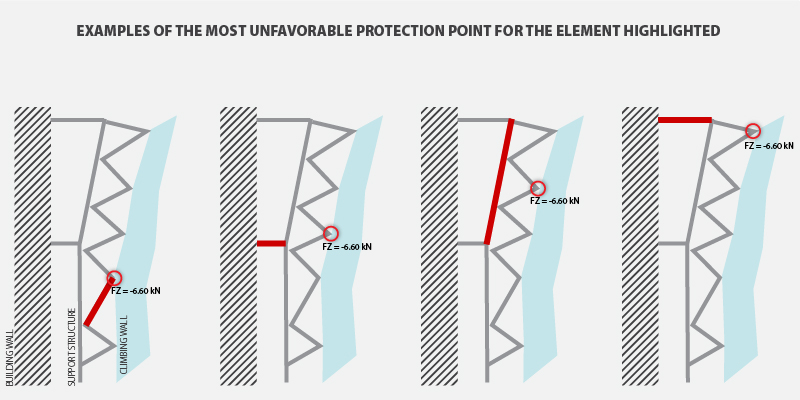
For instance, the standard clearly defines all the loads which need to be considered in the calculations and states they should be applied in the most unfavorable protection point. However, it gives no instruction on how to define the point in question.
The truth is, that’s not possible since the design load of each protection point affects each of the elements of the structural support differently. As a consequence, the most unfavorable protection point may vary for each one of the elements.
This is why our team at Walltopia believes the only way to calculate the structural integrity of the structure is by first creating a complete 3d calculation model that includes all elements of the climbing wall. Then we apply the normative loads on each one of the protection points successively and in the process, we find the most unfavorable protection point for each element and each connection between the elements. Unfortunately, not many companies in the industry go to such lengths to ensure they really take into consideration the most unfavorable combination of loads for the structure.
Another red flag in the climbing standard is that it allows the substructure which connects the protection points and the support structure to be proven by a practical load test. That would’ve been acceptable 10-15 years ago when all climbing walls were flat and the connections between the protection points and the support structure were all the same. Nowadays, however, the walls have evolved into a complex 3D geometric structure and the protection points get fixed to the metal construction with elements of different lengths and in different angles.
In addition to this, the elements of the support structure to which the protection points get fixed also vary by size and thickness of the profile, as well as spatial orientation. All this goes to demonstrate that the practical testing of a single sample is completely irrelevant.
The T-nuts are an essential part of the climbing wall which plays a key role in the facility’s functionality and durability. That said, the only requirement the standards include regarding the t-nuts is about their breaking point (according to Annex E).
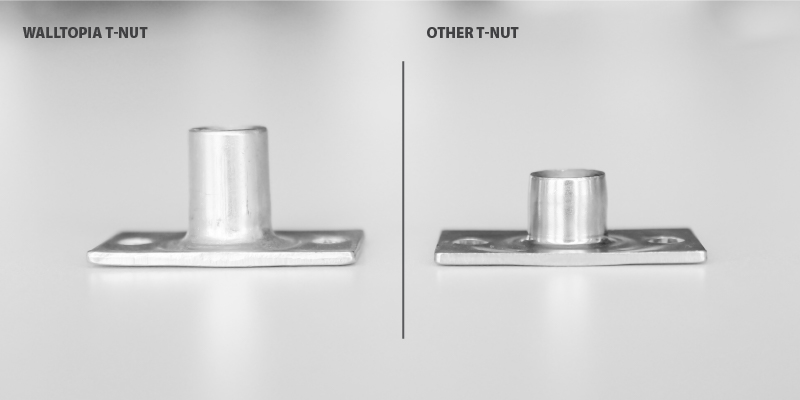
This, however, is far from enough. We want our t-nut not just to hold sturdily, but to also be strongly fixed to the plywood wall panel. This is why we fix it with two very thick, solid screws – this prevents it from getting out of the panel even if the hold installation fails due to a damaged or rusted fixing bolt.
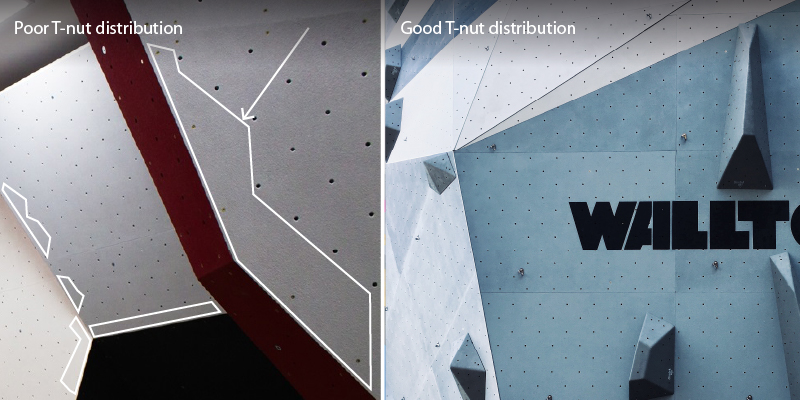
Another fine detail we pay attention to is the distribution of the t-nuts on the panel surface, so that there are always enough of them around the corners. Most of the climbing wall producers need to place wooden pieces to connect the panels to each other and having T-nuts on the very corner usually disturbs this connection – an important detail that sometimes gets overlooked.
Furthermore, we have also set a requirement for a maximum distance between the panel’s surface and the beginning of the t-nut’s thread. This makes the route setters’ job much easier and reduces the risk of the hold bolts being cross threaded.
When it comes to panels, the standard focuses only on the strength of the material of which they are made. Of course, the requirements are a lot more and the reason is that they define the functionality of the facility, as well as the way it looks and how much it costs to operate. Walltopia has set the following requirements for the panels which we produce:
1. Texture:
1.1. Friction. The level of friction is almost always a point of dispute. If you ask ten different climbers to evaluate the same texture, you can be certain that you won’t get the same answer twice. Some of them will settle it was just fine, some will say it was slippery, and others will have found it too rough. In spite of this, we still believe that we’ve managed to create the surface which will get you the highest customer approval rating.
1.2. Wear resistance. This is an incredibly important property of the texture since, unsurprisingly, it’s the part with the highest depreciation rate and basically defines the facility’s life expectancy. We believe the texture shouldn’t wear off and should also keep its vivid colors for no less than 20 years. In order to control this process, we created a special procedure for the rapid testing of texture fatigue.
1.3. Anti-dirt ability. Operators rarely take this into consideration, but climbing walls get dirty quite easily and on top of this, are very difficult to clean. Walls with standard surfaces quickly start looking older than they are, while stain-resistant surfaces keep their fresh look for much longer. This is why we believe it’s our duty to provide you with the best looking walls, regardless of how many people climb them daily.
1.4. UV resistance. Climbing walls or part of them are often exposed to direct sunlight which is why it’s advisable to use UV resistant coating for the finish layer of their panels in order to prevent their coloring from going pale. Most manufacturers assume that climbing walls will be installed in enclosed spaces with no direct sunlight around, which is why they use non-UV resistant epoxy coatings. We prefer to assume the opposite – that all walls we produce could be installed in a place with direct sunlight, which is why we’ve set the standard of using UV resistant materials for our products.
2. Connecting parts between the panels.
The industry offers many different solutions for connecting the wall panels together. Some use bolts (with flat or cone heads) placed on the face and steel plates or hinges from the back, while others use wooden profiles fixed with screws visible on the panel’s front. For the last 5 years, we have been using a hidden link where all screws are fixed behind the panel – this way they’re not visible on the front and the wall looks far more aesthetically pleasing.
3. Grab line.
This element isn’t required by the climbing standards either, but we consider it obligatory and it comes as part of our standard package. It ensures a comfortable grip at the end of the route and safer and easier clipping in the top rope station.
When it comes to outdoor climbing walls, we must take into consideration that they are exposed to rain, snow and humidity, and set new requirements for the materials we use. Even though the climbing standard doesn’t mention this at all, we know that in order to make an outdoor structure suitable for use and ensure its longevity, we need to use a different range of materials from the ones used for indoor climbing structures.
1. Support structure.
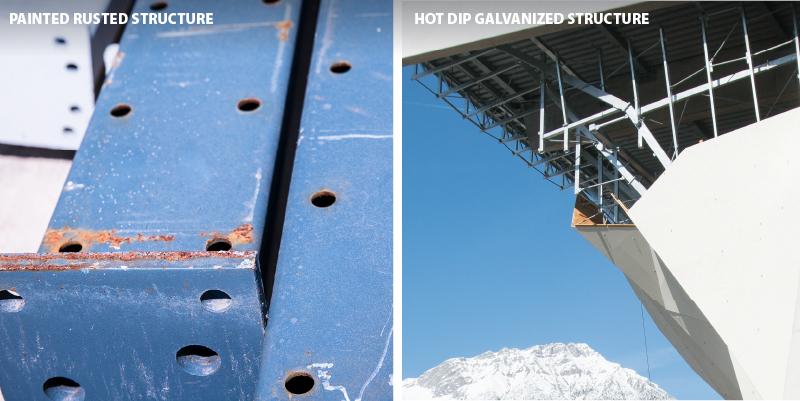
The standard procedure in regards to the metal construction of indoor climbing walls is for it to be primed and painted, with the most often used paint for this purpose being polyurethane or alkyd. However, if the climbing wall is installed outdoors and especially in a humid region, it takes around only a year for the painted construction to start rusting.
As a consequence, the operator needs to start repainting it regularly, this way spending a lot of money on yearly maintenance. This is why we hot-dip galvanize all elements of our outdoor metal constructions which prevents them from corroding. All fasteners used for assembling said elements are also stainless steel or hot-dip galvanized.
2. Panels.
Installing plywood panels outdoors leads to a serious reduction in the wall’s lifespan. This is why we recommend using plywood panels only if the following requirements are met:
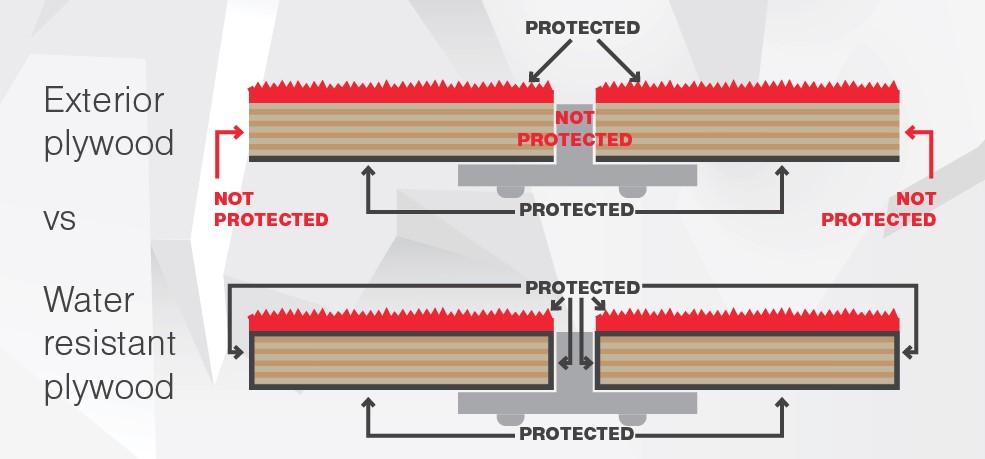
2.1. Exterior plywood. Many people believe that using exterior plywood guarantees the panel’s durability in outdoor spaces. This can’t be further from the truth. The difference between interior and exterior plywood is only the type of glue used for sticking their layers together. The glue used for exterior plywood doesn’t allow the layers delamination if they get wet, however this doesn’t do anything to protect the veneer from getting moist. This is why we recommend:
2.2. Impregnating the back, the edges and t-nut openings. It’s a common practice in the industry not to impregnate the back of the plywood panels installed outdoors. This can’t usually cause so much damage, since the moisture normally penetrates from the top layer of the plywood and can’t get through the barrier the glue creates, so it doesn’t get into the core of the panels.
However, it can be very damaging when the humidity gets through from the panel’s edges and the t-nut holes, because this way it can spread throughout the whole panel and dramatically shorten its lifespan. This is why it’s completely obligatory to impregnate all the weak points, such as corners and t-nut openings – that makes them completely sealed and protected from the contact with water.
2.3. Stainless steel t-nuts and screws. Most manufacturers often ignore these details, but in order to ensure maximum water resistance and durability for the product, we know our outdoor structures should be equipped with stainless steel t-nuts and stainless fixing screws.
2.4. Rain shelter. Walltopia recommends to always cover outdoor climbing walls, made with PLW panels with shelters. The roof will protect the panels and the metal construction from direct contact with the water and extend their lifespan, while also providing customers with the opportunity to climb even when it’s raining.
This list doesn’t even scratch the surface of our effort to provide you with the best quality product on the market. As you can see, there are a lot of factors to take into account when choosing a climbing wall – factors which can significantly influence the success of your facility.
Our lengthy industry experience helps us see what can be improved and we give special attention to all these details because for us, it’s not a matter of standards – it’s about striving for perfection. And we believe that perfection comes from the synergy between design, installation, and technical details.
*Pictures are for illustration purposes only.


